Docker & Dockerization in DevOps : Part-I
End-to-end understanding of Docker and Dockerization in DevOps
Docker is a platform that enables developers to package applications and their dependencies into lightweight, portable containers. These containers can run consistently across different environments, simplifying the development and deployment process. Before understanding Docker, let's first start with Containerization.
What is Containerization?

You want to deploy a project (external) that has its instructions only for MacOS but not for other OS users
Even if you have created the project somehow, what if the owner of the project has added a new feature to it? What would you do? Keeping track of dependencies?
What if there is a way to define your project's configuration in a simple file? What if there's an isolated environment where it could be run?
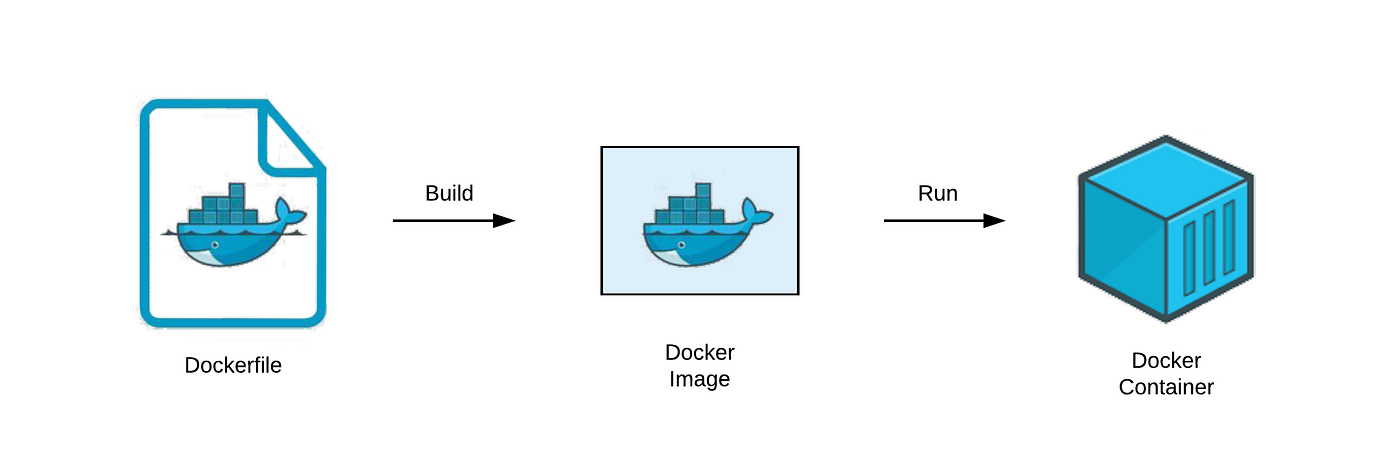
The simple file in which we define all the configurations for the projects is Dockerfile, and Container is the environment where you run the code.
What does Docker do?
It makes it easier to set up and deploy projects/ containers.
Allows for container orchestration,
Let's take an analogy of Git and GitHub to understand docker. In GitHub, you have the Command line interface and working of Git, and GitHub is the platform to store and host the projects.
Similarly, the docker has its own working CLI, with DockerHub being the registry for storing/deploying images (which we'll learn further)
Docker has 3 parts
Command Line Interface, like git, has its own CLI; Docker has some specified subcommands to control the workings in docker.
The engine, where you run the commands, will hit the engine ( Docker deomon ), which runs the docker code base.
Registry, Images/Containers are deployed/stored here in DockerHub. It's Github, but instead of codes, we deploy the images.
Docker Installation
Docker installation instructions can vary based on your operating system. Here are brief instructions for popular operating systems:
For Linux:
Ubuntu:
 sudo apt-get update
 sudo apt-get install docker.io
Fedora:
 sudo dnf install docker
 sudo systemctl start docker
 sudo systemctl enable docker
For macOS:
Install Homebrew if not installed.
Install Docker:
brew install dockerStart Docker:
brew services start docker
For Windows:
Download and install Docker Desktop.
- Follow the installation wizard.
Verify Installation (for all systems):
docker --version
docker run hello-world
If Docker is installed correctly, you'll see information about the installed version, and the "hello-world" container will run, indicating a successful installation.
Images vs Containers
Images are the things that you see in your phone gallery..., no guys, just kidding.
Image is a template from which consistent containers are generated. For example, you want to download an app, but first, you will get a dmg/ISO file and then generate the app.
Images define the initial filesystem state of new containers. They bundle your app's source code and its dependencies into a self-contained package that's ready to use with a container runtime
Let's create a container, for that you need to have an image first, say you have an index.js file.
Open a terminal or command prompt in the same directory as your
Dockerfile(which we'll learn soon)andindex.js, then run the following command:docker build . -t your-image-namewith all the files in the directory you create an image.
When you run the image, a container is created. Image is like a template, containers are instances created when we run the images. Use the following command to run the image
docker run <image-id>docker images is storing data and when you run it you'll get the container.
can run it again & again to create new containers.
after creating the image, you can push it to DockerHub
Some will pull it from DockerHub and create containers with the image
  docker pull image-name
  docker run image-name
Create a basic full stack app, to understand the containerizing it. This tutorial is not about creating to full stack webapp. You can use ChatGPT for this.
Containerize the Backend
To containerize an app, we have to create a dockerfile, This is where a DevOps Engineer spend a lot of time. You describe the dependencies, ports, commands etc in it.
For the project we have done, find the configuration of dockerfile below
            FROM node:20
            WORKDIR /usr/src/app
            COPY ..
            RUN npm install
            EXPOSE 3000
            CMD ["node,index.js"]
Every dockerfile starts with ' FROM something ' command, the something here will be your base image. On which you will create your image, which will be a base you will start from.
Writing ' FROM something ' command, if same as downloading an app from the ISO/dmg file, the file is giving you a base environment to start with.
The App we have created here is a nodejs app; hence we are using a node base image; you can also use ubuntu base images, stratch base image, etc.. For this we have to explicitly write all the installation instructions for node, hence using a node-based image could be more efficient.
' WORK DIR ' - change work directory for running the base code
' COPY ..' - copying all the source code in the app to the working directory (where we changed the path to in the previous command). first dot indicates the all files in the source folder and the next dot indicated the over to the directory, which we have specified in the dockerfile.
RUN npm install - creates node_modules and contains all your external dependencies. You can also directly run this command in the folder on the local machine and then copy the file, but this is not recommended.
One way to ensure you never copy node_modules in the image is to put the "node_modules" inside the .dockerignore file. Whatever you have inside won't be copied over there file wont get copied.
EXPOSE 3000: Exposing a specific port. A container is not necessarily always an HTTP server so it can run for a longer time. They run and die. Hence your local machine would not want to send all requests to this port.
As you wouldn't want to have too much power. But the container job, at the very minimum, is to expose (3000 Port), saying let the request come my way. Then it's your machine to decide whether to give it the request or not. (we have specified the 3000 port in the express app)
CMD [ ], this command specifies what commands to run when container is running. all the above commands run when you're creating an image. This command would run when you run an image/ starting a container NOT when building an image.
Interview question : What is the difference between the CMD and RUN command here ?
Answer : CMD runs when running an image , RUN is like install these dependencies and is run wen building an image.
Creating the image
How would we create the image with the dockerfile made, we use the following command to create an image.
docker build . -t <Image_tag>
after a while of rendering, you can see the process is done, to see your image, type the following command to get the list of images created. Image_tag is nothing but the image name you put.
docker images
Image to Container
to create a container, you have to run the image created. We use the following command to run the image/ create the container
docker run <Image_tag>
Congrats, you have created your first container, now go and check at the localhost:3000 (3000 port was defined in the express app) to see the app running. I'll wait here for a while.
Port Mapping (Important)
What happened, didn't see any app running on the 3000 port. This is because we didn't define the port mapping. As we discussed while understanding about EXPOSE command in the dockerfile, we understood that it depends on the local machine to send the requests to the port, but we are stating that send all the requests coming to the port to the container.
There can be multiple other containers which run and are exposed for the 3000 port, then how will the machine know to expose the port for the suitable container.
Port mapping helps us here, have a look for the following command
docker run -p 3000:3000 <Image_tag>The command states that the 3000 port of the local machine, should send its requests to the 3000 port of the container, which are creating now.
you can playaround by changing the port values, like 3003:3000, here 3003 port of machine would send its requests to the 3000 port of the container. you can check if a container is running by the following commands, it will give the list of containers that are running
docker ps
Pushing the image to DockerHub
we use the following command to push the image to DockerHub.First, you should have created a repository in DockerHub. Here try to keep the image tag as same as the repository's name you have put in the dockerhub.
docker push <Image_tag>sometimes you may get an access denied error. Please try 'docker login' and give the username and password/PAT for the login. Then try pushing the image to the repository.
you can give the following command to your peers to get the image installed and run the container. The person doesn't need to download any other dependencies, it's like they are installing a new environment for the app and can directly run the app. One can find the following command also in the repository.
docker pull <Image_tag>
Please find the codes and assignments for the boot camp in the GitHub Repository
Stay tuned for the upcoming blogs for part 2 and interesting algorithms.
